文章简介
搭建了自己的个人博客,需要把自己先前写的文字放到个人博客上,使用 node.js 倾情构建。
注意
本文所述软件已在 GitHub 上以 MIT 协议开源,且比文章里解释的代码先进很多。由于软件后续更新等因素,不保证仓库内软件与本文所述代码同步。
用户使用该软件引发的一切效应都与作者无关。
前言
由于搭建了自己的个人博客,需要把自己先前写的文字放到个人博客上,这就需要一个爬虫。
而我很不习惯缩进狂魔 Py ,思来想去还是决定用 JavaScript 写。
必要条件
- 你自己的 WordPress 博客站
- Node.js
- 优秀的网络
- 灵巧的双手
- 聪明的大脑
环境准备
进入一个新文件夹,创建 Node 环境:
npm init信息什么的随便写啦(
然后可以开始编辑 index.js 了。
开始代码
准备依赖
引入 https 库以从网站获取网页:
//引入https
const https=require('node:https');
引入 fs 库来写入文件:
// 引入文件系统
const fs=require("node:fs");
引入 async 以控制流程(不然 js 默认的异步处理会导致不必要的麻烦):
npm install asyncconst async=require('async');引入 JSDOM 来实现浏览器式(你甚至都不用学 jQuery )的 HTML DOM 处理:
npm install jsdom// 引入 JSDOM
const jsdom=require("jsdom");
const { JSDOM } = jsdom;引入 webp-converter 以实现图像的自动 WebP 转换:
npm install webp-converter// 引入 WEBP 转换器
const webp=require('webp-converter');引入 turndown.js 以实现转换成 Markdown:
npm install turndownvar TurndownService = require('turndown');
var turndownService=new TurndownService();然后我还顺便引入了 colors-console 库以实现五彩斑斓的输出()
npm install colors-consoleconst color = require('colors-console');让我们先写一个简单的日志函数罢:
function info(_info){
	console.log(colors("green", "INFO"), _info);
	return;
}
获取参数
这里我们直接从命令行获取参数:
if(process.argv.length != 5){
// 理想的参数应该是
// node index <网址> <文件名> <图片前缀>
// 共 5 个
  console.log(colors("red","FATAL"),"参数数目不规范!");
  process.exit();
}
var args={ // 使用命令行参数初始化 args 变量
  link: process.argv[2],
  filename: process.argv[3],
  imagePrefix: process.argv[4]
}
获取网页内容
使用 https.get() 或 http.get() 方法即可。
htmlString=new String();
https.get(args.link,function(resource){
  resource.on("data", function(chunk){
    htmlString+= chunk;
  });
  resource.on("end", function(){
      startGenerating(htmlString, args); // 解析的主方法
  });
});
主要入口函数
新建一个叫 startGenerating 的方法:
function startGenerating(html,argument){
    info("开始生成");
    var srcs;
    async.series([
        function(callback){
            createDir(argument);
            callback(null,"createdir");
		},
        function(callback){
            srcs= loadDOM(html,argument);
            callback(null,"loaddom");
        },
        function(callback){
             processImages(srcs,argument);
            callback(null,"downimage");
        },
        function(callback){
            info("生成完成!");
            callback(null,"done");
        }
    ]);
}async.series:async库提供的顺序执行代码,接受的参数是一个函数数组。callback:callback(err,message);
创建文件夹
function createDir(argument){
    try{fs.mkdirSync(`./output/${argument.imagePrefix}`);}
    catch(err){
        if(err.code!="EEXIST"){ // EEXIST: 文件夹已存在
            console.error(err);
            console.log(colors("red", "FATAL"), "出现错误");
            process.exit(1);
        }
        console.log(colors("yellow", "WARN"), `目录 ${argument.imagePrefix} 已存在`);
    }
}- 没什么好说的。
解析 HTML
新建一个叫 loadDOM 的方法:
function loadDOM(_html, argument){
// “解析 HTML” 一节内的代码写在这里。
}
载入 DOM
const dom=new JSDOM(_html);
var document=dom.window.document;
获取文章主体元素
var div=document.querySelector("div.entry-content");
info("DOM 已载入");- 在这里使用
document.querySelector这样的浏览器式代码是得益于JSDOM。 - 在 WordPress 中,至少在 University of Fool 使用的 Vilva 主题中,文章主体元素就是 ``
获取文章图像列表
var srcs=new Array();
div.querySelectorAll('img').forEach(function(node,n){
	srcs[n]=node.src;
	node.src=(`/img/${argument.imagePrefix}/${argument.imagePrefix}-${n}.webp`);
});parentNode.querySelectorAll(selector): 从该元素的所有子元素里选择与selector匹配的元素,返回值的类型是NodeListNodeList.forEach: DOM 模仿 JavaScript 自带的Array类型的forEach方法,用法是一样的node.src: `` 等元素的src属性值- 此处
srcs数组是为了下载图片并转换做准备。
去除所有的样式表
div.querySelectorAll('style').forEach(function(node){
	node.outerHTML=null;
});Node.outerHTML: 这个节点本身的HTML代码
去除标题外层的 <span>
我们看一看源代码,可以看见标题外面有两个 <span>:
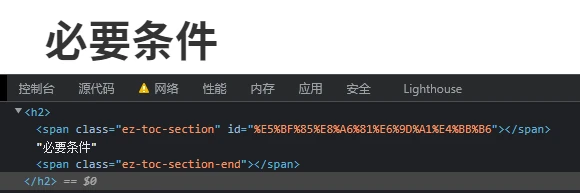
我们应该把它去除:
div.querySelectorAll('h1, h2, h3, h4, h5, h6').forEach(function(node){
	var headingText=node.textContent;
	node.innerHTML=headingText;
});Node.textContent: 返回节点内所有 HTML 标签的内容,不含 HTML 标签本身。
去除代码块的多余内容
我们再看一看源码:
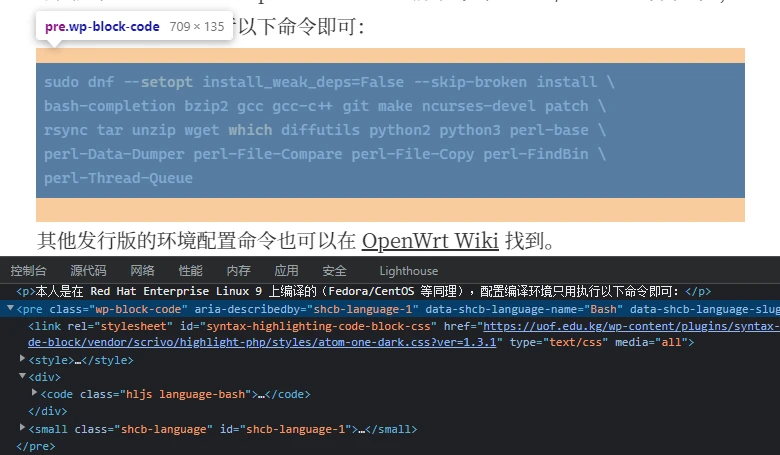
要去除。
div.querySelectorAll('pre').forEach(function(node){
	var codeText=node.querySelector('code').textContent;
	node.outerHTML=`<pre><code>${codeText}\n</code></pre>`;
});
去除空行
var html=new String();
div.innerHTML.split('\n').forEach(function(line){
	if(line!=new String()){
		html+=`${line}\n`;
	}
});
转换成 Markdown
var output=turndownService.turndown(html);//转换 Markdown
info("文件已改写");
写入文件
try{fs.writeFileSync(`./output/${argument.filename}`, output, 'utf8');}
catch(err){
	console.error(err);
	console.log(colors("red", "FATAL"), "出现错误");
	process.exit(1);
}
结束函数
info(`${fileType} 文件已写入`);
return srcs;
处理图片 -> 入口函数
为了防止异步执行和简化代码结构,我把入口函数单独分了出来:
function processImages(srcs,argument){
    info(`开始下载和转换图片,总计 ${srcs.length.toString()} 个`);
    srcs.forEach(function(value,key){
        processSingleImage(value, key, argument);
    });
}
处理单张图片
入口函数
新建函数 processSingleImage:
function processSingleImage(source, n, argument){
	// 处理单张图片一节内的代码都写在这
}
下载图片
info(`正在下载图片 ${n+1}`);
https.get(source, function (response) {
	var data=new String(); // 文件内容总是字符串
	response.setEncoding("binary"); // 不设置成 binary 会导致乱码
	response.on("data", function (chunk) {
		data+=chunk;
	});
	response.on("end",function(){
		fs.writeFileSync(('./cache/' + n.toString() + '.png'), data, 'binary'/* 同上 */, err => {
			if (err) {
				console.error(err);
				console.log(colors("red", "FATAL"), "出现错误");
				process.exit(1);
			}
		});
		info(`图片 ${n+1} 下载完成`);
		//-------------------下一小节的代码写在这----------------------
	});
});
转换成 WebP
try{
	webp.cwebp(`./cache/${n}.png`, `./output/${argument.imagePrefix}/${argument.imagePrefix}-${n}.webp`, "-q 70 -alpha_q 50");
}
catch(err){
	console.error(err);
	console.log(colors("red", "FATAL"), "出现错误");
	process.exit(1);
}
finally{
	info(`图片 ${n+1} 转换完成`);
}
webp.cwebp(source, output, argument):source是需要转换成 WebP 的文件路径,output是输出的文件路径,argument是传递给 Googlecwebp命令行工具的额外参数try-catch-finally: 先运行 try ,如果出现错误就运行 catch(我们在 catch 内退出了程序),最后运行 finally。
开始爬取
写好之后 记得保存!记得保存!记得保存! ,运行我们写好的代码:
node index.js <网页地址> <输出文件> <图像前缀>然后,你应该能在 output/ 里看到生成的文件
后记
这篇文章只是记下了我写 html2blog.js 时的思路,而且算是最初版和最新版的糅合(?),因此不保证使用。
如果你确实需要使用我的文章,请查看 GitHub 项目。